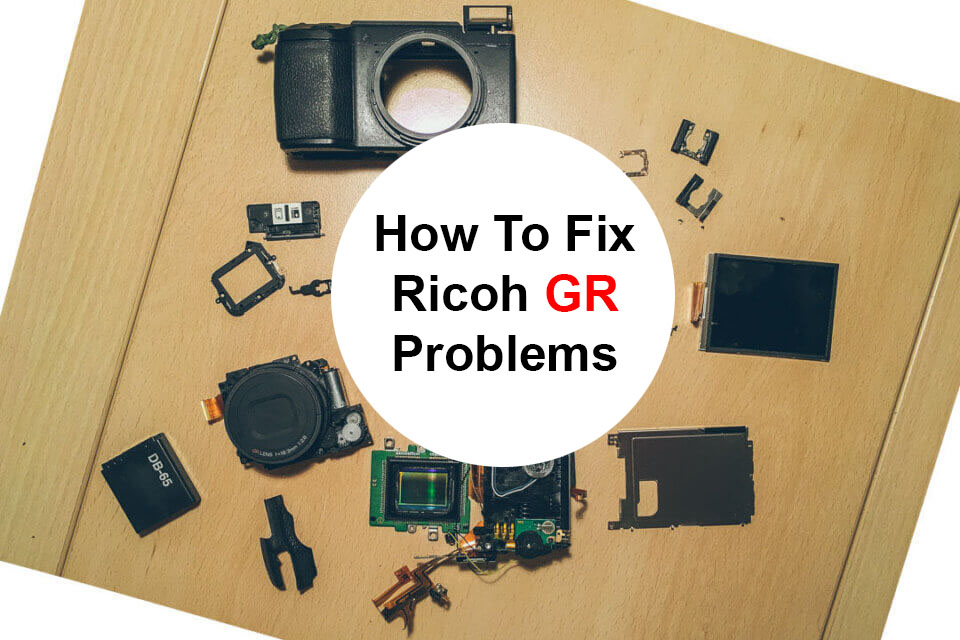
In this post we describe and give instructions Howto Avoid & Fix Common Ricoh GR Problems. All problems and tips apply to Ricoh GR & GR II Camera models. Some of the problems and tips apply to the GR III and IIIx models.
Post updates:
- 2022.12 – Reformating post and moving content to my personal website michaelkowalczyk.eu
- 2022.06 – Adding image and link to DYI repair post of the broken camera flex cable by Tommy Jing-Tao Liu
Table of Contents (Drop Down Menu)
1. Dust on the Sensor / Hot Mirror (GR, II, III, IIIx)
Dust particles enter the camera, deposit along the image path and become visible as black points / smudges on the photograph. With higher f-stops they stand out more clearly.

Who is reporting this problem?
- The search for “Dust” on DPreview.com Ricoh Talk Forum brings up 102 threads.
- The GR III is affected too!
Why does it happen with a GR & GR II ?
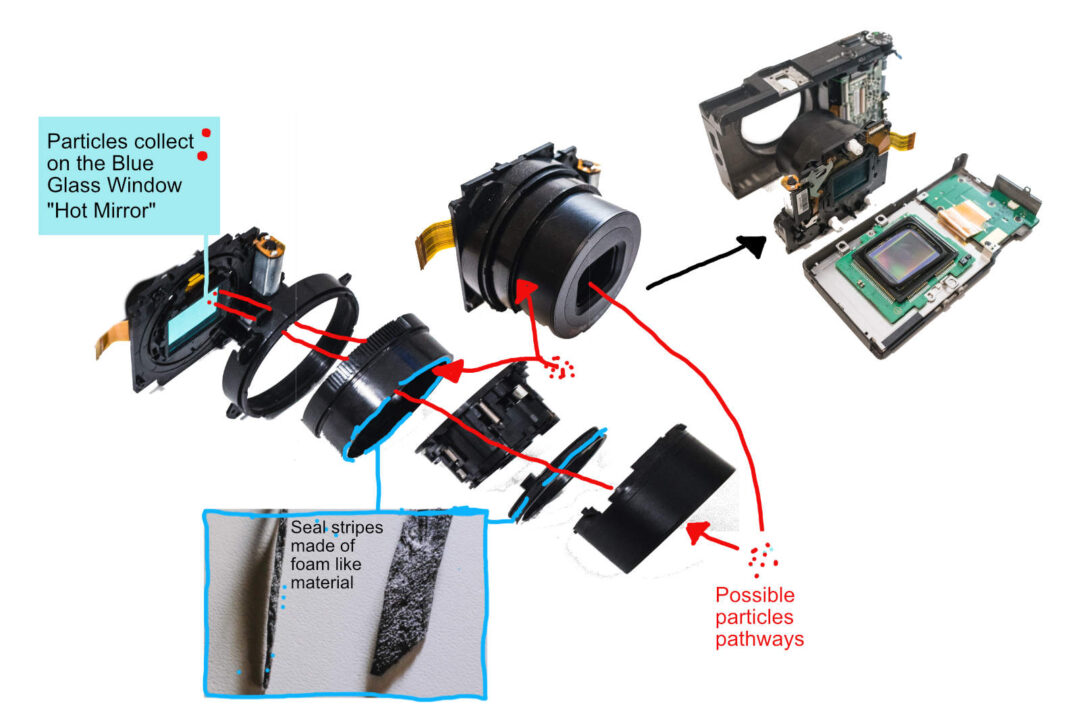
Dust can enter trough gaps in between the lens housing
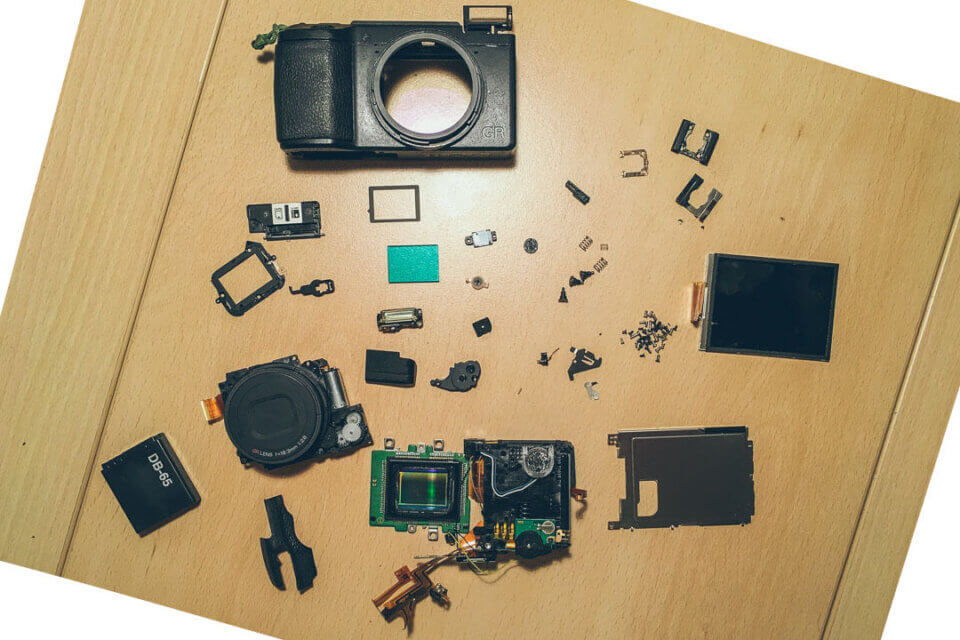
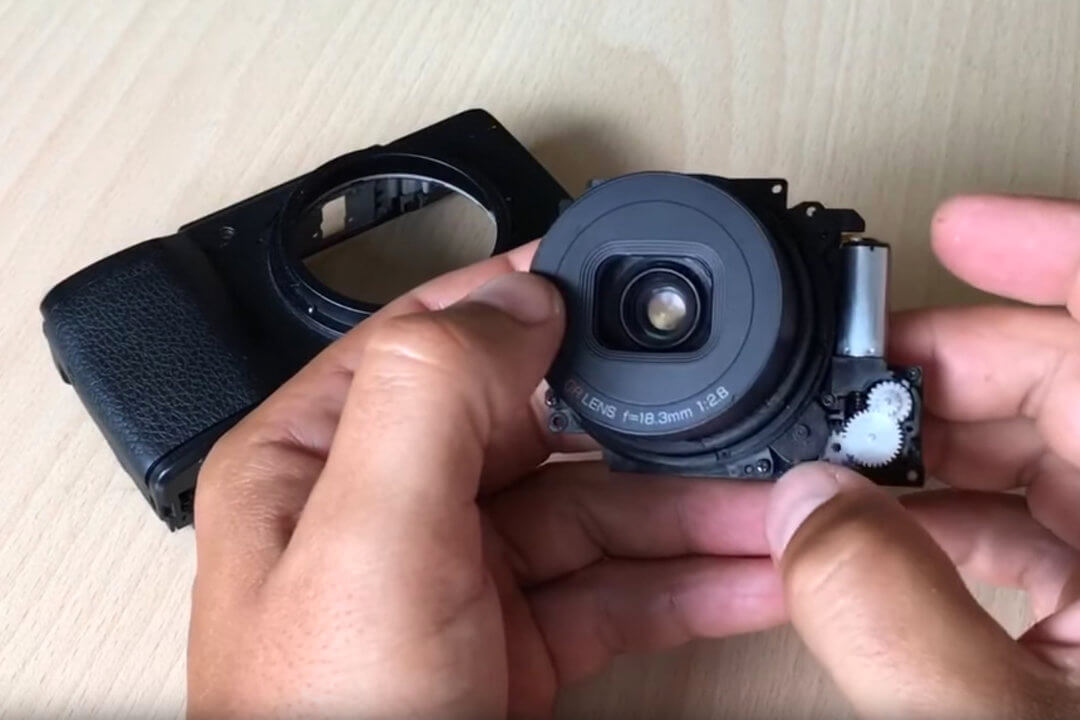
The retractable GR & GR II Lens Unit consists of the housing barrels and the lens module. The unit is screwed onto a rectangle plastic plate with a blue glass in the middle, called “Hot Mirror“. It reflects the infrared light and also acts as physical barrier against particles depositing on the sensor behind it. With the lens breathing air while extracting and retracting, dust particles can enter the housing trough the front and side gaps in between the rotating barrels. Ricoh engineers tried to seal both pathways using a stripes of thin foam like material. The material thicknes and sealing quality degrades with usage. It is suspectible to tear apart and flake into smaller pieces which can enter the lens too. Particles traveling trough the lens will most likely deposit on the Hot Mirror and not on the sensor.
Dust can enter trough gaps in between the camera body
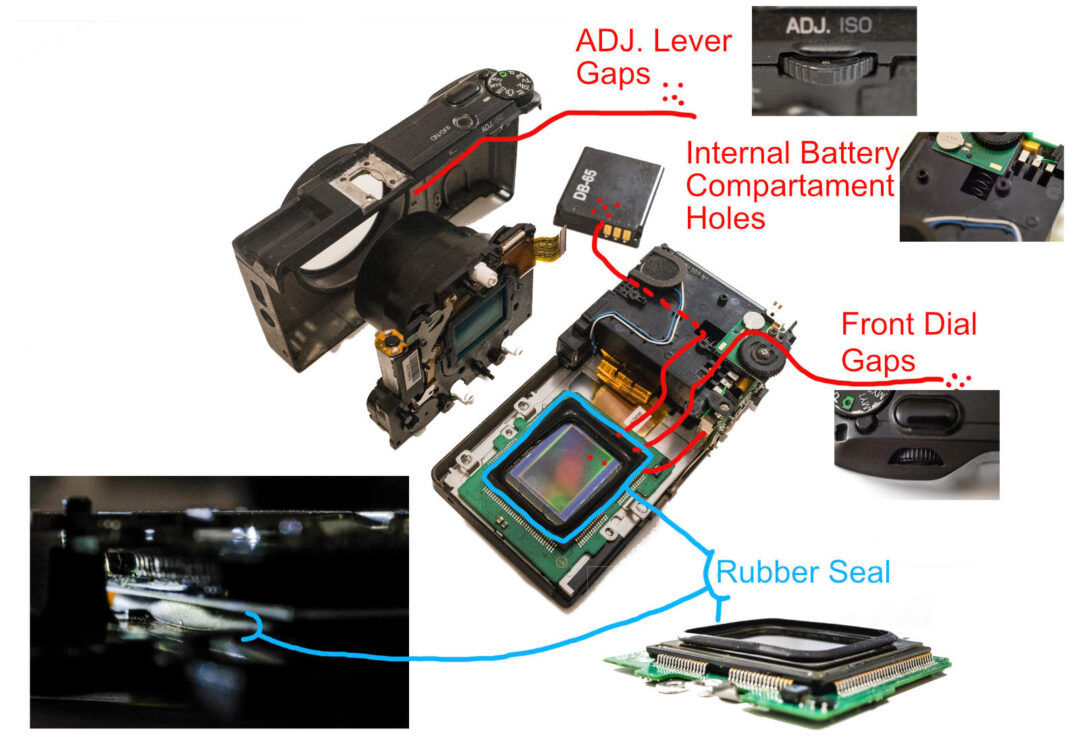
The magnesium and plastic parts of the GR camera body include three openings for particels to enter the body. The first around the ADJ. Lever/Button. The second around the Front Wheel. The third inside the Battery Compartment. Dust and particulary the photographers own dead finger skin can enter on each side of the controls. When inserting the battery dust particles can be pushed trough the cutout holes in the battery compartement into the body.
To protect the Ricoh GR and GR II sensor the engineers decided to place a rectangular shaped Rubber Seal on top of the sensor plate. Once the sensor module is screwed together with the beforementioned lens module, the rubber seal squeezes together, ideally forming a protective dust barrier. However the rubber does not necessarily compress in a uniform way (lower left photo below). This is potentially the achilles heel for particles to slip under.
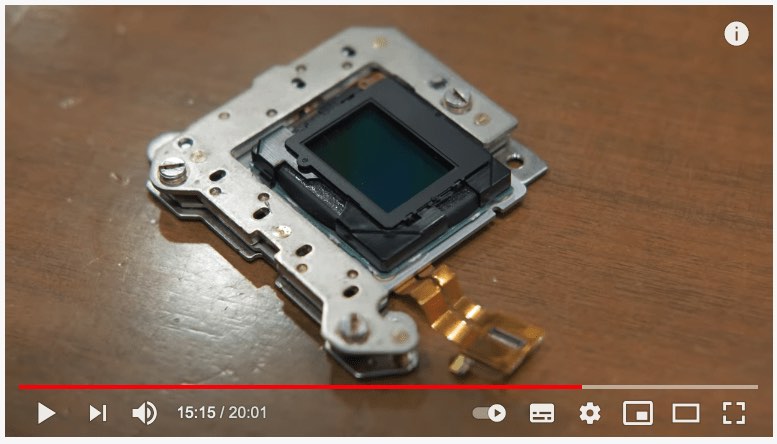
The GR III & IIIx lens modules are different
The description about rubber seal does not apply to the GR III model in the same way. As showed in the the YT-video Meeting Ricoh Imaging Japan! (GRIII & Showroom) @15:15min. the hot mirror seems to be screwed directly on top of the sensor, making a possible seal more tight or even unnecessary. However the question remains if there is a physical barrierer in between the hot mirror and the lens module?
Howto protect a Ricoh GR, GR II, GR III and GR IIIx camera from sensor dust.
Mount the Ricoh GA Lens Adapter accessory and screw a high quality nano coated 49mm clear filter on it. This will seal the lens barrel against particles that might enter each time the camera is turned on and off.
- Ricoh GR & GR II uses the GH-3 Lens Adapter – Order via affiliate @Amazon @Ebay
- Ricoh GR III uses the GA-1 Lens Adapter – Order via affiliate @Amazon @Ebay
- Nisi Optics offers an alternative GR III Lens Adapter made of metal including a 49mm filter thread.
- Ricoh GR IIIx uses the GA-2 Lens Adapter – Order via affiliate @Amazon @Ebay

To further minimise the insertion of dust, turn the camera off in between shots (startup time is only 0,8-0,6 seconds) and store it in a lint free camera bag. Not your jeans pocket!
Howto check for dust spots
ITo see the dust spots clearly we need to make a photograph of an evenly lit, uniform surface.
- Focus on a white surface or manual at the blue sky @infinity.
- Set the camera to Av-mode and increase the f-stop to f/11 or f/16. The higher the f-stop number the clearer dust particles become visible on the photo.
- To minimize high image noise interferance try shooting with low ISO 100-400. Less is better.
- If shooting handheld try to capture a sharp shot with a shutter time of at least 1/125th or faster. Use a tripod or put the camera on a flat surface.
- Make the photo, review the image on a bigger screen and note the location(s), lenght(s) and definitions of the dust spot(s).
Howto remove dust spots
- By removing the dots using a clone tool in your image editing software
- By using the cameras built in sensor shake (dust removal) feature (GR III, IIIx)
- By pressing an ultrasonic toothbrush against the camera body. (see video below)
This can potentially vibrate particles off the sensor. However they will be still trapped inside the camera. - By cleaning the Sensor / Hot Mirror yourself
- DYI GR, II disassembly and sensor cleaning instruction on jamiecollison.com and hackcorrelation.blogspot.de.
- DYI GR III, IIIx disassembly and sensor cleaning instructions on Dpreview https://www.dpreview.com/forums/thread/4600195
- By sending the camera to an authorized Ricoh camera repair service in your region
Example of the ultrasonic toothbrush vibrations:
2. Closed Shutter after Power On, Broken Shutter Flex Cable (GR, II)
The Ricoh GR & GR II shutter remains closed after Power On and the display remains black.
Follow the instructions on: Howto repair a Ricoh GR (II) with Closed Shutter / Broken Flex Cable
3. Stuck Out & Locked Lens (GR, II, III, IIIx)
After power off the lens will not retract into the body and remains in the the extended power on position. Pushing and forcing the lens back inside the body is not possible.
Who is reporting this problem?
- Ricoh GR – Lens stuck, repairable? https://www.flickr.com/groups/2181763@N20/discuss/72157658291004729/
Ricoh GR lens stuck – https://www.youtube.com/watch?v=cPi34W-XFU8RIP My Ricoh GR Stuck Lens Problem https://www.youtube.com/watch?v=kvu-RO0NDwA
Why does it happen?
Possible reasons
- The camera was dropped and the lens barrels are missaligned.
- The camera encountered and internal error. It is programmed to extended the lens to a fail safe point.
Howto avoid it
- Do not drop your GR on the ground ^_^
Howto fix it
Temporarily
Long term
Contact and send the camera to an authorized Ricoh camera repair service in your region.
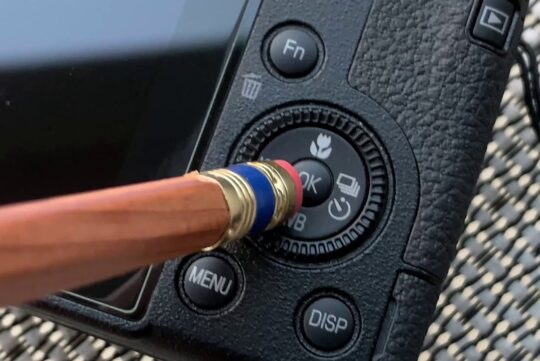
4. Wobbly Circle Dial (skipping values when turning) (GR III, IIIx)
Ricoh GR III users report that turning the rear circle dial (adjusting ISO) leads to unexpected outcomes. ISO values randomly jump up or down. For example, instead of going down from ISO 800 to 400 the ISO changes to 1000.
Who is reporting this problem?
Why does it happen?
Most likely grease, dead skin or other small particles have accumulated under the round function dial. The continouus electronic contact is disturbed, leading to nonlinear value changes.
Howto avoid it
- Wash your hand and clean wipe the camera back once in a while (:
How to fix it
From outside
- The Dpreview.com forum member “ricohgriiiwheelfix” (; reported that dripping alcohol on the dial and spinning it helped him to get it to work again.
- Another reported solution was to using compressed air on the dial.
From inside
- The Dpreview.com forum member “Mausinspektor” shard a detailed step by step DYI post howto dissassemble and clean the Ricoh GR III (IIIx) circle dial.
I read in several fora that The griii has a Huge heat problem. Is it Common to this model or is it just happensonly in some faulty batches?
Hi Mauro, from what I read on several forums, (I read Dpreview most frequently) the heat issue affect every GR III until now. It appears to be more noticeable after longer power-on times. If you turn the camera off and on the heat will not built up as fast. Check this infrared heat camera comparison (including GR III) for example https://www.dpreview.com/forums/post/62558531
Does anyone know where I can find this 4 pins motor to which lens flex cable soldered? Or at least how it calls to google it.
Please help
Well, seems that now I reached 3 of 4 issues you listed above. I really love the camera (maybe because was my first) now thinking about what could be the next and of course, one more durable. Thanks for putting together all this known issues
Sorry to hear Daniel. At least you maxed it out! Whats the next camera? This seems to be always a good discussion starter :) How about a camera with a non-retractable lens design? You can check out http://streetphototip.com/library/52-pancake-lens-comparison-list-street-travel-photography/ to get a small pancake lens to go with it. Good luck and let us know what you got instead!
Thank you for this post – very helpful!
I have the stuck lens problem. I‘m curious if there’s a way to fix theses plastic gears that move the lens mechanism? For example to clean it from dirt and to put a little oil to it?
Have you tried this?
I‘m asking before dismantling the camera in vain..
thanks in advance for your opinion!
Best,
Artem
Hallo Artem
In order to get to the white motor gears you will have to unscrew pretty much all parts inside the body. I did this procedure one a one way trip and did not plan to put it back together. I am not sure if anything can get in between the white gears since they are normally covered by a black plastic plate. In the video I removed the plate to show the moving gears. Also putting oil on them would not be recommendable, it could easily spill around.
Best of luck fixing your gear!
Michael
Thanks for the insights. I love the images these cameras can produce, but I may now skip the grIII to replace my prehistoric Fuji s5..Fuji I wish I knew how to quit you.
Sincerely,
Don Pancake
Hello Michael, and thanks very much for the clear and well-organized post.
FWIW, on the DPReview site I posted about an examination of the GR lens unit I did, with respect to the stuck lens/dust-sealing problem. I have since bought a GR II, plus the adapter and clear filter, in light of what I found in this examination of my GR. What looks like a flimsy lens casing gasket, plus poor sealing against dust, seem to add up to a poor design with respect to durability in less than optimal conditions. The adapter and filter are a must if you live or take photos in dusty surroundings.
https://www.dpreview.com/forums/thread/4482509
I concur and do the same. Protecting the lens using the lens adapter+filter has priority over size and portability. I noticed and commented on your post on dp too! My broken GR (stuck lens) waits to be inspected it in more detail. I will record and discuss my findings in a video.
How repair Closed Shutter after Power On and Stuck Out & Locked Lens. The cause of the malfunction is a break in the Lens Shutter Flex Cable at the bend (half-width crack). I installed a Lens Shutter Flex Cable For RICOH GR GR2 with Aliexpress and now mine RICOH GR2 works.
Thanks Vadim for follwing up and pointing out a possible cable failure. In fact I broke mine while dissassembling my Gr. This would be a good time to order a new one and install it. The needed soldering tip seems to be a precise one. I will be happy to learn if this 2,99 $ spare part is able to fix the shutter closed issue.
Hello Michael,
The other day my GR II took an unfortunate tumble. Thankfully the unit is still functioning however, the cover that closes over the lens, refuses to fully close on power off. This means that when the unit is off, the lens is vulnerable to dust particles. I have already ordered a cap on Amazon for the time being. Is there any way to fix this issue?
Hello Andrew
From my experience with the lens unit dissasembly it is possible to make it work again. However I only managed to trigger the full closure after removing and reinserting the lens unit out its surrounding barrel enclosure. To get there is a long way with many unscrewing parts! I published a GR dissasembly video to show the way. Good choice to order a cap. As far as I know there exists a auto-open and close cap too!
Hello Andrew, I had the same problem after dropping mine…check the ring with the writing on it is not raised slightly – if it is press it back down. I know of two other cases where this had happened after dropping and that was a solution!
Hi Michael, thank you in advance for the help.
My problem is that the flash on my Ricoh GRII has just stopped working. I am making sure that auto bracket, continuous shooting etc is turned off. I tried all modes but it wont come on. What could be the problem?
Rick
Hallo Rick
if not related to settings (tried factory resetting the camera?) it could be a hardware problem. A loose solder cable contact from a drop, a defect photoflash capacitor (the build in flash-battery) or even defect flash bulb.
As you show it very clearly, the Ricoh GR (both analogue and digital) is very prone to many problems. I know what I am talking about. I have had several GR’s and encountered all those issues. This is very sad for such a fine, but rather expensive camera. It simply should be built more solidly.
Hi Michael! The lens on my Ricoh gr10 film camera will not open or come out upon powering on. Also the LCD is just blinking. I can hear the lens clicking, potentially trying to open, when I press the on button. I thought it was a battery problem but nothing changed when so I replaced it. Any idea what it could be?
Thanks!
Hallo Fatimah. Did you check the manual? Anything specific happend when the camera started to act like this? Could be a mechanical problem. Good luck fixing the camera!
Hi Michael! Thanks for the response. I couldn’t find anything in the manual (here: https://www.manualslib.com/manual/1009736/Ricoh-Gr10.html). I took the camera to the beach right before it stopped working, so potentially there are some grains of sand stuck in the lens. Any recommendations if this is the case?
Thanks for the manual link. Sounds reasonable that little sandcorns could cause the lens machnism to malfunction. If it is a valuable camera to you, then consider a professional repair service and let us know how it worked out.
I had an unfortunate drop with my GRIII, and it makes a sound if I shake it. Also noticed an issue when switching between macro and normal mode, the lens makes some weird sound again. Thankfully everything thing else is working fine, just not sure if it’s worth doing a repair. Any recommendations, or is it best to leave it alone? This was such a helpful article, thank you for sharing btw!
In Germany people say “glück im unglück” wich translates to luck in a unlucky situation. If it works leave it alone. Otherwise let a camera service have a look at it. Have fun while it lasts.
Unsure what I may have done but my rear screen only shows anything is when it is in U1, 2 or 3. In all other modes, screen is completely blacked out. I can take photos and they appear fine on replay in any of the modes that I used.
I imagine that this could also be caused by a camera display setting? If not then you can configure any of the blacked out modes to be available on U1,2 or 3.
I had a stuck lens problem as well I carefully sprayed some silicone spray around the lens tube and until now ;-) it is still working wel again grtz Paul
Does anyone know where I can find this 4 pins motor to which lens flex cable soldered? Or at least how it calls to google it. Please help
Usually electronic parts have some desciprions written on them. Not sure if that is the case with the motor?
I’ve left question here about ricoh gr but it was removed. Why? I realy need help
My GRII “flickers” on the MY1 setting only. For example, if set to MY1 it will instantly and consistently acts like you have turned the control dial to another shooting mode and back to MY1 even though you haven’t turned it… so, if you are in MY1 and start to take a photo and half press the shutter release to get a focus or meter exposure it will instantly reset like you turned the mode dial and restablished it again, zeroing out any function you just imputed. Could there be a fouled connection in just that mode position or a glitch in the custom setting?? it doesn’t seem to do this in any other shooting mode.
Sorry for the late replay Tony. Did you get it fixed meanwhile? To me it sounds like some dirt/particles accumulated under the mode dial, causing the tiny metal connectors not to be able to make proper contact for the mode.
Hi,
My GR II interval timer don’t work anymore and the self timer works randomly. Would you know what the problem is and if it has a solution ? Would resting the camera bring a solution or would it be a useless attempt for that these specific issues. Thank you for any insight.
Hallo Alain. Sorry but I have no clue why the selftimer would misbehave. Try a rest. Also check if you use the latest firmware. Best of luck. M.
My Flash stop firing, the last time I used it it worked perfectly but I tried again and it hasn´t work in a while. I try formatting the camera to leave it like brand new and it didn´t work. Any suggestions?
Hallo Gerado. Sorry I can´t say what is wrong with that flash. Best regards. M.
Hey Michael, I found your video through youtube and found it super helpful, have you encountered how to replace or fix the flash on the GR II?
Hallo Sam. I did not record a detailed howto disassemble the flash. You can exchange the flash light if that is waht you look for. I remember unscrewing a couple of parts. I hink there were a couple of cables + a flat cable to take care of. Be aware of the potentially still charched capacitor! Best of luck!
Hi Michael
When I turn on my GRiii it opens for 3 seconds, then the display says “lens error” and the retracts.
What to do ???
1st. check the internet for people posting about this, like so: https://www.dpreview.com/forums/thread/4424006#forum-post-63060302
2nd. you could send it to a camera service. They can disassemble the unit and check for errors. Best of luck and let us know what caused it!